These two discs that I can produce from the broken glass piece. My tools are Oil Cutter and Sharpening stone.
 Here I detail a bit how to get sight marks on the glass discs.
Fig. 1: Draw a pattern using a school mathemathical set.
Fig. 2: Get the discs together and place them on the pattern.
Fig. 3: Make 4 lines from edges of the glass to smallest circle of the pattern.
Fig. 4: Turn over the discs and draw '+' from the centre of the smallest circle on the disc ie the second glass of discs.
Fig. 5: Sight marks are drawned on both glass discs.
 And here is just the Plumber's left over plastic material.
 Fig. 1: Platic pipe.
Fig. 2: Cut a length of it upon how long you wish that you want your sight to be.
Fig. 3: Make 4 rings out of the pipe and these rings are use to lock the glass discs that to be place inside the tube of fig. 2.
Fig. 4: One ring is already placed inside the plastic tube.

The Sight is completed. It is a very simple sight. Effective?? You may try and make one.

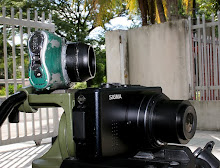
Yeaaa...... the sight is now attached to the spotting scope. The sight can be positioned at the side or on top of the scope.
 Here is a field test with the sight. An example here is a street lamp. With it can speed up your search for your subject.

 Here is a field test with the sight. An example here is a street lamp. With it can speed up your search for your subject.
Happy Birding.